WIN下phpstorm不能检出svn的问题
今天使用win上的phpstrom发现不能检出svn服务器上的文件,折腾了一番才发现原来是svn设置问题。
解决办法:
进入settings
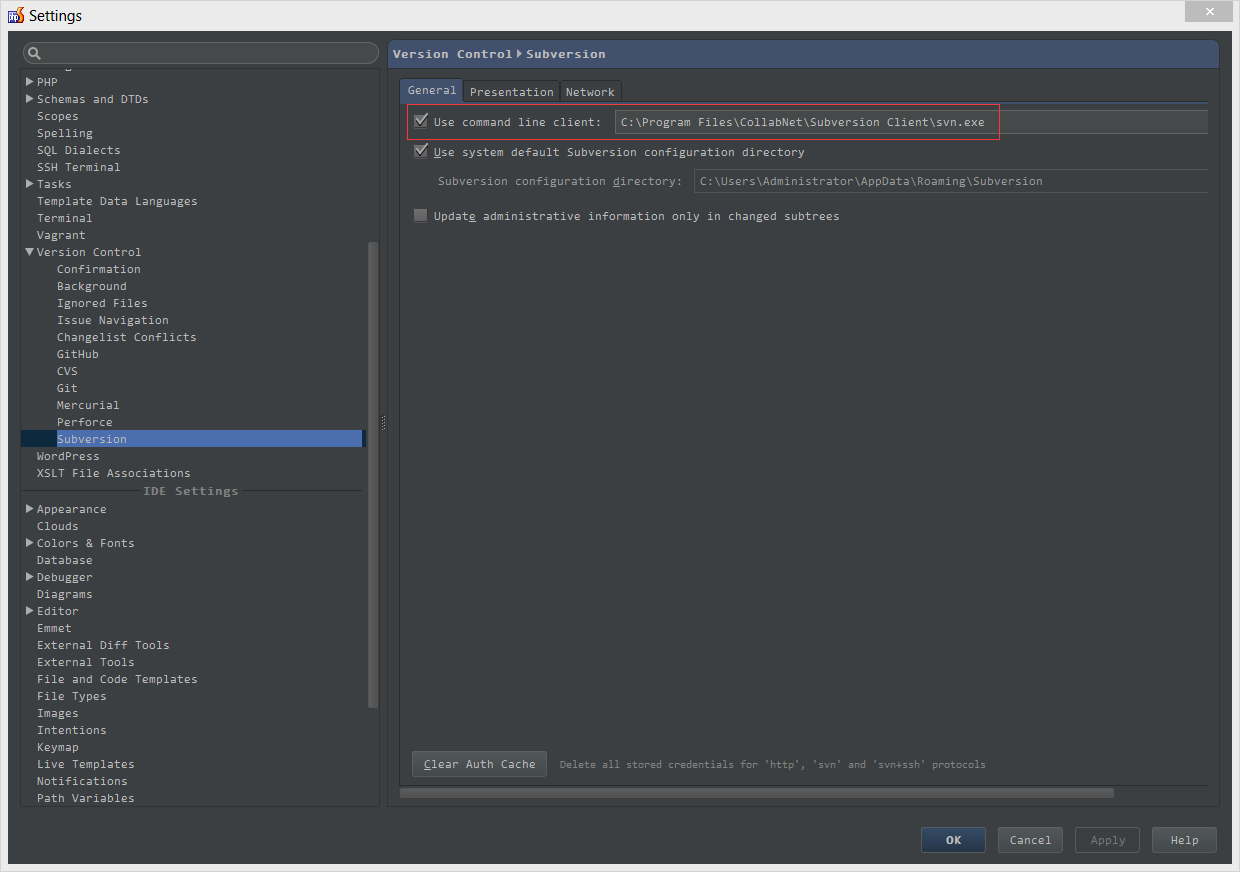
按照下图设置:

这里我们指定了svn的命令行路径,CollabNet\Subversion Client是CollabNet出的svn客户端命令行工具,换成其他的也可以,只要路径指定正确就行。
附下载地址:
今天使用win上的phpstrom发现不能检出svn服务器上的文件,折腾了一番才发现原来是svn设置问题。
解决办法:
进入settings
按照下图设置:

这里我们指定了svn的命令行路径,CollabNet\Subversion Client是CollabNet出的svn客户端命令行工具,换成其他的也可以,只要路径指定正确就行。
附下载地址:
昨天老高的博客受攻击了,本想着没啥流量就不用太在意,哎,防人之心不可无啊!
先装个DoS-Deflate试试看效果吧!
wget http://www.inetbase.com/scripts/ddos/install.sh
sh install.sh
vi /usr/local/ddos/ddos.conf
# show
##### Paths of the script and other files
PROGDIR="/usr/local/ddos"
PROG="/usr/local/ddos/ddos.sh"
IGNORE_IP_LIST="/usr/local/ddos/ignore.ip.list"
CRON="/etc/cron.d/ddos.cron"
APF="/etc/apf/apf"
IPT="/sbin/iptables"

##### frequency in minutes for running the script
##### Caution: Every time this setting is changed, run the script with --cron
#####          option so that the new frequency takes effect
FREQ=1

##### How many connections define a bad IP? Indicate that below.
NO_OF_CONNECTIONS=150

##### APF_BAN=1 (Make sure your APF version is atleast 0.96)
##### APF_BAN=0 (Uses iptables for banning ips instead of APF)
APF_BAN=0

##### KILL=0 (Bad IPs are'nt banned, good for interactive execution of script)
##### KILL=1 (Recommended setting)
KILL=1

##### An email is sent to the following address when an IP is banned.
##### Blank would suppress sending of mails
EMAIL_TO="root"

##### Number of seconds the banned ip should remain in blacklist.
BAN_PERIOD=600
白名单路径:/usr/local/ddos/ignore.ip.list 配置文件路径:/usr/local/ddos/ddos.conf
wget http://www.inetbase.com/scripts/ddos/uninstall.ddos
sh ./uninstall.ddos
centos官方 Aliyun Open Source Mirror Site 网易开源镜像站
免费的virtualbox,下载地址 KVM Xen
记一次centos最小安装 centos7.0 的最小化安装
# 关闭防火墙
service iptables stop
chkconfig iptables off
chkconfig ip6tables off
# SELinux
vi /etc/selinux/config
# change
SELINUX=disabled
#网卡
------
vi /etc/sysconfig/network-scripts/ifcfg-eth0
TYPE=Ethernet
# change
ONBOOT=yes
NM_CONTROLLED=yes
# change
BOOTPROTO=dhcp
or
BOOTPROTO=static
# 加上
# 静态IP
IPADDR=192.168.1.107
# 设置子网
NETMASK=255.255.255.0
# 设置网关
GATEWAY=192.168.1.1
# 设置DNS
DNS1=114.114.114.114
IPV6INIT=no
USERCTL=no
------
service network restart
chkconfig network on
------
# 全局关闭IPv6
vi /etc/sysctl.conf
#加上
net.ipv6.conf.all.disable_ipv6 = 1
net.ipv6.conf.default.disable_ipv6 = 1
------
sysctl -p
reboot
yum install -y vixie-cron
yum install -y crontabs
service crond start
yum install -y mysql-server
mysql_db_install
mysql_secure_installation
service mysqld start
yum install -y ntpdate rdate
ntpdate 210.72.145.44
# 慎用
yum install -y zabbix zabbix-get zabbix-server zabbix-web-mysql zabbix-web zabbix-agent
打开错误:
ini_set( 'display_errors', 'On' );
编译安装nginx后,没有将nginx配置为服务,则无法使用诸如service nginx restart的命令,下面我们看看如何将其配置为服务。
vi /etc/init.d/nginx
写入以下内容,并修改nginx路径
#!/bin/sh
#
# nginx - this script starts and stops the nginx daemon
#
# chkconfig: - 85 15
# description: Nginx is an HTTP(S) server, HTTP(S) reverse
# proxy and IMAP/POP3 proxy server
# processname: nginx
# chkconfig: 2345 90 91
# description: nginx web server
# processname: nginx
# config: /opt/nginx/conf/nginx.conf
# pidfile: /opt/nginx/nginx.pid

# Source function library.
. /etc/init.d/functions

# Source networking configuration.
. /etc/sysconfig/network


if [ -f /etc/sysconfig/nginx ];then
. /etc/sysconfig/nginx
fi

# Check that networking is up.
[ "$NETWORKING" = "no" ] && exit 0

nginx="#改为nginx二进制的路径"
prog=$(basename $nginx)

NGINX_CONF_FILE="/etc/nginx/nginx.conf"

[ -f /etc/sysconfig/nginx ] && . /etc/sysconfig/nginx

lockfile=/var/lock/subsys/nginx

start() {
[ -x $nginx ] || exit 5
[ -f $NGINX_CONF_FILE ] || exit 6
echo -n $"Starting $prog: "
daemon $nginx #-c $NGINX_CONF_FILE
retval=$?
echo
[ $retval -eq 0 ] && touch $lockfile
return $retval
}

stop() {
echo -n $"Stopping $prog: "
killproc $prog -QUIT
retval=$?
echo
[ $retval -eq 0 ] && rm -f $lockfile
return $retval
killall -9 nginx
}

restart() {
configtest || return $?
stop
sleep 1
start
}

reload() {
configtest || return $?
echo -n $"Reloading $prog: "
killproc $nginx -HUP
RETVAL=$?
echo
}

force_reload() {
restart
}

configtest() {
$nginx -t #-c $NGINX_CONF_FILE
}

rh_status() {
status $prog
}

rh_status_q() {
rh_status >/dev/null 2>&1
}

case "$1" in
start)
    rh_status_q && exit 0
    $1
    ;;
stop)
rh_status_q || exit 0
    $1
    ;;
restart)
    $1
    ;;
test)
    configtest
    ;;
reload)
    rh_status_q || exit 7
    $1
    ;;
force-reload)
    force_reload
    ;;
status)
    rh_status
    ;;
condrestart|try-restart)
    rh_status_q || exit 0
    ;;
*)
echo $"Usage: $0 {start|stop|status|restart|condrestart|try-restart|reload|force-reload|test}"
exit 2
esac
chmod a+x /etc/init.d/nginx
chkconfig --add nginx
chkconfig nginx on
service nginx start
service nginx stop
service nginx reload
转自:
自从使用mac以后,ssh连接总是超时成了老高的一个心病啊,只要一小会儿不动电脑,远程就失去相应,或者干脆直接提示broken pipe,然后断掉。现在终于有了算是能接受的解决办法。
~.,是的,你没有看错!这个组合命令就是主动断开ssh的命令,不行自己问问man。
服务器和客户端每隔一定的时间会发一个KeepAlive请求,避免因为路由器或线路的限制而断线,例子中的60s可以因具体的环境改变。
修改/etc/ssh/sshd_config,修改ServerAliveInterval一项,而ServerAliveCountMax表示如果失败重试的次数
ServerAliveInterval 60
ServerAliveCountMax 3
vi /etc/ssh_config
ClientAliveInterval 60
ClientAliveCountMax 3
完
scp命令经常用在主机之间拷贝文件用,但是如果目标机器的sshd的端口不是默认的22,怎么办呢?
scp -P 1111 [email protected]:/home/xxx
这样就可以配合ssh-keygen -t rsa命令将生成的pub重命名为authorized_keys,并拷贝至目标机器的~/.ssh/文件夹下,这样以后就可以无密码登录ssh了。
完
yum install -y vsftpd
vi /etc/vsftpd/vsftpd.conf
#add
listen_port= XXXX
anonymous_enable=NO
local_enable=NO
chroot_local_user=YES
chroot_list_enable=NO
xferlog_enable=YES
xferlog_std_format=YES
xferlog_file=/var/log/xferlog
dual_log_enable=YES
vsftpd_log_file=/var/log/vsftpd.log
vi /etc/vsftpd/user_list.txt
#add
roooooooter
random_passwd
#生成认证文件
db_load -T -t hash -f /etc/vsftpd/user_list.txt /etc/vsftpd/user.db
#删除明文
rm -f vi /etc/vsftpd/user_list.txt
#编辑vsftpd的PAM认证文件
#删除其他行,加入下面两行
#pam_userdb.so 为认证库文件 db即上文user.db
vi /etc/pam.d/vsftpd
auth required pam_userdb.so db=/etc/vsftpd/user
account required pam_userdb.so db=/etc/vsftpd/user
#设定FTP用户映射(注意权限)
useradd –d /home/xxx –s /sbin/nologin xxx
chmod 700 /home/xxx
#开启虚拟用户
vi /etc/vsftpd/vsftpd.conf
#开启虚拟用户
guest_enable=YES
#FTP虚拟用户对应的系统用户
guest_username=xxx
#PAM认证文件
pam_service_name=user
#虚拟用户配置文件
user_config_dir=/etc/vsftpd/vsftpd_user_conf
mkdir -p /etc/vsftpd/vsftpd_user_conf
#xxx为虚拟用户名
vi /etc/vsftpd/vsftpd_user_conf/xxx
#设置权限
local_root=/home/xxx
write_enable=YES #开放markwang的写权限
anon_world_readable_only=NO #开放markwang的下载权限
anon_upload_enable=YES #开放markwang的上传权限
anon_mkdir_write_enable=YES #开放markwang创建目录的权限
anon_other_write_enable=YES #开放markwang删除和重命名的权限
当virtual_use_local_privs=YES时,虚拟用户和本地用户有相同的权限;
当virtual_use_local_privs=NO时,虚拟用户和匿名用户有相同的权限,默认是NO。

当virtual_use_local_privs=YES,write_enable=YES时,虚拟用户具有写权限(上传、下载、删除、重命名)。

当virtual_use_local_privs=NO,write_enable=YES,anon_world_readable_only=YES,
anon_upload_enable=YES时,虚拟用户不能浏览目录,只能上传文件,无其他权限。

当virtual_use_local_privs=NO,write_enable=YES,anon_world_readable_only=NO,
anon_upload_enable=NO时,虚拟用户只能下载文件,无其他权限。

当virtual_use_local_privs=NO,write_enable=YES,anon_world_readable_only=NO,
anon_upload_enable=YES时,虚拟用户只能上传和下载文件,无其他权限。

当virtual_use_local_privs=NO,write_enable=YES,anon_world_readable_only=NO,
anon_mkdir_write_enable=YES时,虚拟用户只能下载文件和创建文件夹,无其他权限。

当virtual_use_local_privs=NO,write_enable=YES,anon_world_readable_only=NO,
anon_other_write_enable=YES时,虚拟用户只能下载、删除和重命名文件,无其他权限。
anonymous_enable=YES            允许匿名登录local_enable=YES                  允许本地用户登录
write_enable=YES                      开放本地用户写权限
local_umask=022                        设置本地用户生成文件的掩码为022
#anon_upload_enable=YES          此项设置允许匿名用户上传文件
#anon_mkdir_write_enable=YES  开启匿名用户的写和创建目录的权限
dirmessage_enable=YES            当切换到目录时,显示该目录下的.message隐藏文件的内容
xferlog_enable=YES                    激活上传和下载日志
connect_from_port_20=YES        启用FTP数据端口的连接请求
#chown_uploads=YES                是否具有上传权限.  用户由chown_username参数指定。
#chown_username=whoever        指定拥有上传文件权限的用户。此参数与chown_uploads联用。
#xferlog_file=/var/log/vsftpd.log
xferlog_std_format=YES              使用标准的ftpd xferlog日志格式
#idle_session_timeout=600          此设置将在用户会话空闲10分钟后被中断
#data_connection_timeout=120    将在数据连接空闲2分钟后被中断
#ascii_upload_enable=YES        启用上传的ASCII传输方式
#ascii_download_enable=YES    启用下载的ASCII传输方式
#ftpd_banner=Welcome to blah FTP service 设置用户连接服务器后显示消息
#deny_email_enable=NO  此参数默认值为NO。当值为YES时,拒绝使用banned_email_file参数指定文件中所列出的e-mail地址用户登录。
#banned_email_file=/etc/vsftpd.banned_emails 指定包含拒绝的e-mail地址的文件.
#chroot_list_enable=YES    设置本地用户登录后不能切换到自家目录以外的别的目录
#chroot_list_file=/etc/vsftpd.chroot_list
#ls_recurse_enable=YES
pam_service_name=vsftpd 设置PAM认证服务的配置文件名称,该文件存放在/etc/pam.d/
userlist_enable=YES    此项配置/etc/vsftpd.user_list中指定的用户也不能访问服务器,若添加userlist_deny=No,则仅仅/etc /vsftpd.user_list文件中的用户可以访问,其他用户都不可以访问服务器。如过 userlist_enable=NO,userlist_deny=YES,则指定使文件/etc/vsftpd.user_list中指定的用户不可以访问服务器,其他本地用户可以访问服务器。
listen=YES              指明VSFTPD以独立运行方式启动
tcp_wrappers=YES        在VSFTPD中使用TCP_Wrappers远程访问控制机制,默认值为YES
参考
http://www.cnblogs.com/welkinwalker/archive/2010/04/14/1711880.html http://yuanbin.blog.51cto.com/363003/129071