使用shadowsocks轻松搭建翻墙环境教程
之前大家翻墙可能都会用到免费的goagent代理,但是他速度慢,链接也不稳定,看油管更是无望,更好的解决方案是shadowsocks。
shadowsocks是一个著名的轻量级socket代理,基于python编写。
如果你有国外的VPS,那么使用shadowsocks搭建一个翻{防屏蔽}墙服务器是一件很轻松的事情!
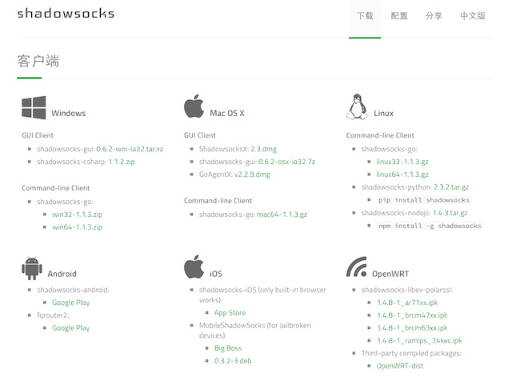
先看看shadowsocks覆盖的客户端覆盖了多少系统,连OpenWRT都支持!
老高之前买的$4.99一年的VPS,128MB,用起来妥妥的!现在已经升级至$9.99,512MB内存,运行速度更快,翻{防屏蔽}墙速度更是没话说,如果你感兴趣,可以看看VPS购买攻略。
看完本文,你就能够轻松打造独享的翻{防屏蔽}墙环境!甚至能够将shadowsocks安装到你的路由器中,子网设备自动翻墙!再也不需要在网上购买shadowsocks的账号了,也不需要在忍受速度巨慢的免费shadowsocks账号了。
如果你的VPS是搬瓦工,那么恭喜你!你可以直接在后台一键安装shadowsocks,具体如何操作请参考使用搬瓦工(bandwagonhost)后台管理VPS&安全设置中如何一键安装shadowsocks一节,配置完毕后ss就会运行在后台,重启后也会自动运行。
友情提示:有些打包好的ss程序很难保证是否会记录你的服务器信息,所以一定要经常更新服务器端的密码或端口!或者,自己编译一个。。。。。
安装python版本的shadowsocks
假设已经获取了管理员权限,如果没有,有些命令需要用sudo提权。
ubuntu
apt-get update
apt-get install -y python-pip
pip install shadowsocks
centos
curl --show-error --retry 5 https://bootstrap.pypa.io/get-pip.py | python
pip install shadowsocks
此时系统会多出来两个程序:
/usr/bin/ssserver
/usr/bin/sslocal

# 运行帮助命令
ssserver -h
usage: ssserver [OPTION]...
A fast tunnel proxy that helps you bypass firewalls.

You can supply configurations via either config file or command line arguments.

Proxy options:
  -c CONFIG              path to config file
  -s SERVER_ADDR         server address, default: 0.0.0.0
  -p SERVER_PORT         server port, default: 8388
  -k PASSWORD            password
  -m METHOD              encryption method, default: aes-256-cfb
  -t TIMEOUT             timeout in seconds, default: 300
  --fast-open            use TCP_FASTOPEN, requires Linux 3.7+
  --workers WORKERS      number of workers, available on Unix/Linux
  --forbidden-ip IPLIST  comma seperated IP list forbidden to connect
  --manager-address ADDR optional server manager UDP address, see wiki

General options:
  -h, --help             show this help message and exit
  -d start/stop/restart  daemon mode
  --pid-file PID_FILE    pid file for daemon mode
  --log-file LOG_FILE    log file for daemon mode
  --user USER            username to run as
  -v, -vv                verbose mode
  -q, -qq                quiet mode, only show warnings/errors
  --version              show version information

Online help:
开机启动
执行vim /etc/rc.d/rc.local,添加以下内容,(老高这里开了4个端口),你可以只使用一条记录。最后别忘了执行chmod +x /etc/rc.d/rc.local以赋予其执行权限!
简单的解释一下各个参数的作用
-p ss服务器的端口号
-k 密码
-m 加密方式,一般用rc4-md5,table和rc4不要用
--workers 子进程个数
--pid-file 记录pid的文件
--log-file 记录日志
--user 执行用户的权限,一般使用nobody
-v 表示输出详细信息
-d 使用守护进程模式运行
老高的开机启动脚本:
ssserver -p 443 -k passwd -m rc4-md5 --workers 10 --pid-file /tmp/ss.pid --log-file /tmp/ss.log --user nobody -v -d start

ssserver -p 3389 -k passwd -m rc4-md5 --workers 10 --pid-file /tmp/ss2.pid --log-file /tmp/ss2.log --user nobody -v -d start

ssserver -p 10010 -k passwd -m rc4-md5 --workers 10 --pid-file /tmp/ss3.pid --log-file /tmp/ss3.log --user nobody -v -d start

ssserver -p 22222 -k passwd -m rc4-md5 --workers 10 --pid-file /tmp/ss4.pid --log-file /tmp/ss4.log --user nobody -v -d start
这里老高推荐使用-c选项指定config.json的方式配置ss(具体方式下面有提到),配置文件格式基本兼容。GO版本有多端口特性,需要多端口服务的可以自己编译试试。
编译shadowsocks-libev
与介绍原版(python版)的shadowbox服务端,老高这次要介绍的是shadowsocks-libev!
项目地址:shadowsocks/shadowsocks-libev
项目作者:@madeye
以下说明转自:shadowsocks-libev 1.2 发布
shadowsocks-libev 是一个 shadowsocks 协议的轻量级实现,是 shadowsocks-android, shadowsocks-ios 以及 shadowsocks-openwrt 的上游项目。其具有以下特点:
- 体积小巧,静态编译并打包后只有 100 KB。
- 高并发,基于 libev 实现的异步 I/O,以及基于线程池的异步 DNS,同时连接数可上万。
- 低资源占用,几乎不占用 CPU 资源,服务器端内存占用一般在 3MB 左右。
- 跨平台,适用于所有常见硬件平台,已测试通过的包括 x86,ARM 和 MIPS。也适用于大部分 POSIX 的操作系统或平台,包括 Linux,OS X 和 gwin 等。
- 协议及配置兼容,完全兼容 shadowsocks 协议,且兼容标准实现中的 JSON 风格配置文件,可与任意实现的 shadowsocks 端或服务端搭配使用。
shadowsocks-libev 包括服务端和客户端两部分,一共三个模块。
- ss-server:服务器端,部署在远程服务器,提供 shadowsocks 服务。
- ss-local:客户端,提供本地 socks5 协议代理。
- ss-redir:客户端,提供本地透明代理,需要与 NAT 配合使用,具体使用方法参见文档。
原版shadowsocks
请参考 安装shadowsocks-python并启用chacha20加密
准备好的shadowsocks怎么用呢?请看下文。
服务端
你的系统最好是redhat,centos,ubuntu或者debian
安装必要组建
centos执行 yum install build-essential autoconf libtool openssl-devel gcc -y
debian执行 apt-get install build-essential autoconf libtool libssl-dev gcc -y
安装git
centos执行 yum install git -y
debian执行 apt-get install git -y
装完了执行 git --version检查是否安装成功。
shadowsocks 下载及编译
git clone https://github.com/madeye/shadowsocks-libev.git
cd shadowsocks-libev
./configure
make && make install
程序会被安装至/usr/local/bin/下,该路径已存在于系统变量中,所以可以直接使用程序名运行。
/usr/local/bin/ss-local
/usr/local/bin/ss-tunnel
/usr/local/bin/ss-server
/usr/local/bin/ss-redir
如何使用
在使用shadowsocks的时候,你可以随时输入命令ss-server -h查看使用帮助,老高在此将最新的使用帮助打印出来
usage:

    ss-[local|redir|server|tunnel]

          -s            host name or ip address of your remote server
          -p            port number of your remote server
          -l             port number of your local server
          -k               password of your remote server


          [-m ]      encrypt method: table, rc4, rc4-md5
                                     aes-128-cfb, aes-192-cfb, aes-256-cfb,
                                     bf-cfb, camellia-128-cfb, camellia-192-cfb,
                                     camellia-256-cfb, cast5-cfb, des-cfb, idea-cfb,
                                     rc2-cfb, seed-cfb, salsa20 and chacha20
          [-f ]            file to store the pid
          [-t ]             socket timeout in seconds
          [-c ]         config file in json


          [-i ]           network interface to bind,
                                     not available in redir mode
          [-b ]       local address to bind,
                                     not available in server mode
          [-u]                       enable udprelay mode
                                     not available in redir mode
          [-L :]         setup a local port forwarding tunnel,
                                     only available in tunnel mode
          [-v]                       verbose mode


          [--fast-open]              enable TCP fast open,
                                     only available on Linux kernel > 3.7.0
          [--acl ]         config file of ACL (Access Control List)

notes:

    ss-redir provides a transparent proxy function and only works on the
    Linux platform with iptables.
运行服务端
ps.执行命令时,请去掉方括号。加密方式可选择:
encrypt method: table, rc4, rc4-md5,aes-128-cfb, aes-192-cfb, aes-256-cfb,bf-cfb, camellia-128-cfb, camellia-192-cfb,camellia-256-cfb, cast5-cfb, des-cfb, idea-cfb,rc2-cfb, seed-cfb, salsa20 and chacha20
选择加密方式的时候请注意客户端是否支持,同时官方不推荐rc4,des-cfb,table,salsa20-ctr这四种加密方式。
命令行运行
前台运行服务端:
ss-server -s [yourip] -p [Server Port] -k [password] -m [encryption methods]
后台运行服务端:
nohup ss-server -s [Server IP] -p [Server Port] -k [Password] -m [encryption methods] &
使用配置文件运行
注意,config.json需要自己创建,并且需要绝对路径
使用-c 指定配置文件, -f 创建守护进程:
vim config.json
将下面的配置写入config.json
使用的时候请删除注释文字,否则可能会报错!!
# 注释版配置
{
    "server":"servier_ip",   # 服务器IP
    "server_port":65432,     # ss服务器所使用的端口号,建议改到30000-60000
    "password":"password",   # ss服务器密码,轻易不要分享
    "timeout":60,            # 超时时间,建议设置为60
    "method":"rc4-md5"         # 加密方式,需要和客户端配合设置
}

# 复制粘贴版

{
    "server":"servier_ip",
    "server_port":65432,
    "password":"password",
    "timeout":60,
    "method":"rc4-md5"
}
然后执行 ss-server -c config.json -f /tmp/ss.pid 即可!
写入开机脚本
echo "/usr/local/bin/ss-server -c /home/***/config.json -f /tmp/ss-server.pid" >> /etc/rc.local
为了安全起见(非必需),我们使用非root用户运行ss,如何实现呢?
# 如果没有非root用户
# 我们现在就新建一个普通用户
useradd laogao
# 为laogao创建密码
passwd laogao
> 输入两次密码
# 切换用户至laogao
su - laogao
# 在主目录创建第一个配置文件,配置格式请参考`使用配置文件运行`一节
vim ~/config1.json

# 保存完毕即可立即运行
/usr/local/bin/ss-server -c ~/config1.json -f /tmp/ss1.pid

# 设置开启自启动
# 我们先切换至root用户
su - root

# 接着在启动脚本里加入启动命令
# 指定ss以用户laogao的权限运行
# 执行下面的命令时一定注意文件路径是否正确
echo "su - laogao -c \"/usr/local/bin/ss-server -c /home/laogao/config1.json -f /tmp/ss1.pid\"" >> /etc/rc.local
更高级的运行方式
多用户(实例)运行
可能大家都注意到了,在上一节我们提到了config1.json是第一个配置文件,这是为什么呢?
没有错,我们还可以创建配置文件2----config2.json,并以同样的方式运行。
这样,我们的一个服务器就可以对外提供两种,端口不同、密码不同、加密方式也可能不同的shadowsocks服务,然后共享给不同的基友,是不是很方便啊。
需要注意的是,多个配置文件一定要注意的是,配置的端口和pid文件一定是不同的!而密码及加密方式,甚至服务器IP都没有限制。
有些版本的ss提供了更方便的配置方式,但是老高没试过,所以在此就不深究。
例子如下(注意端口不能相同)
config1.json

{
    "server":"1.1.1.1"
    "server_port":11111,
    "password":"test1",
    "timeout":100,
    "method":"aes-256-cfb"
}

config2.json

{
    "server":"2.2.2.2
    "server_port":22222
    "password":"test2",
    "timeout":100,
    "method":"rc4-md5"
}


# 多实例运行例子:
/usr/local/bin/ss-server -c ~/config1.json -f /tmp/ss1.pid
/usr/local/bin/ss-server -c ~/config2.json -f /tmp/ss2.pid

# 查看进程
ps -ef|grep ss-server


xxx      1344     1  0 20:12 ?        00:00:00 ss-server -c /home/xxx/config1.json -f /tmp/1.pid
xxx      1491     1  0 20:24 ?        00:00:00 ss-server -c /home/xxx/config2.json -f /tmp/2.pid
使用supervisor托管shadowsocks
请参考使用supervisor托管shadowsocks,让shadowsocks运行的更稳定!
至此,服务器端可设置已完成!
客户端
当我们搭建完成了shadowsocks服务端,其实只完成了FQ的一半工作,想要真正与世界联通,还需要一个客户端与服务端连接。
ss的客户端也是由clowwindy大牛提供,他的另一个作品ChinaDNS也很NB,大家可以关注一下!
客户端下载
shadowsocks的客户端、服务端还有chrome插件Proxy-SwitchyOmega_v2.3.13的下载,请移步 shadowsocks相关资源下载
下面老高以ShadowsocksX-2.6为例,讲讲如何配置
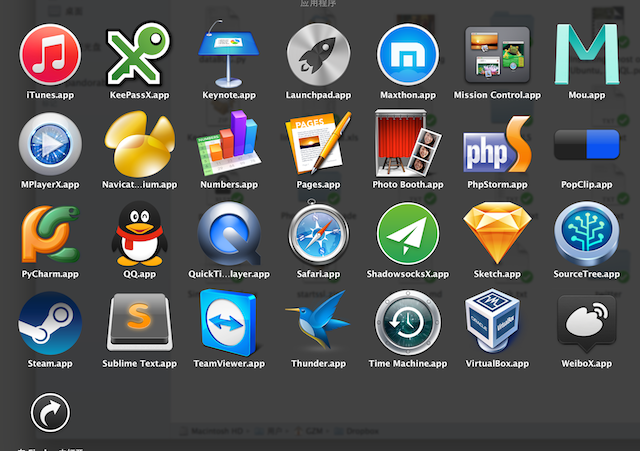
首先安装完毕后找到应用程序并运行
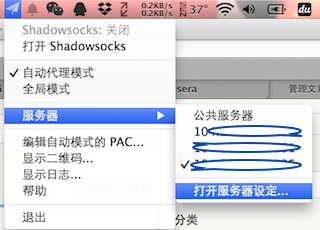
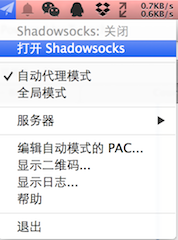
运行后程序会最小化在系统右上角(Windows在右下角),打开菜单,点击服务器-->>服务器设定
配置方法
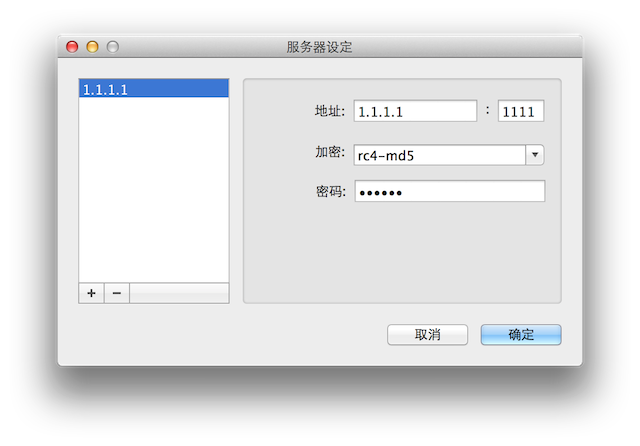
其中1.1.1.1即服务器的IP地址 端口号对应服务器设定的server_port 加密方式和密码就更不必说了
添加完毕,点击确定后,客户端和服务器马上就可以见面了。
最后一步
打开Shadowsocks,教程完毕!
ps.想要在快速的在影梭配置服务器,可以通过在PC端点击生成二维码按钮,然后使用影梭扫描即可!
老高望着着简单而粗狂的画面,许久说不出话来。
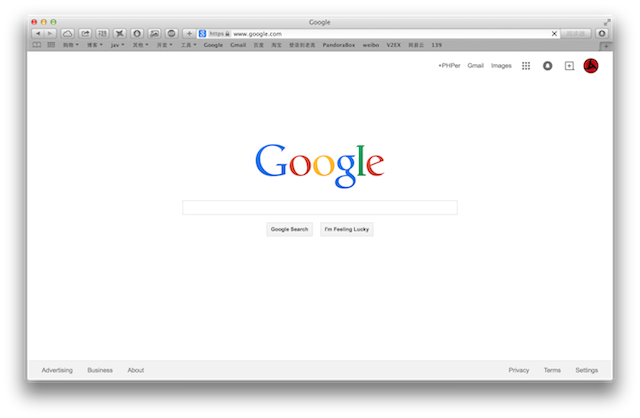
是不是激动的要哭了?
今天先写到这儿,十分感谢广大基友的捧场!老高在此十分感谢!
有兴趣的TX可以在此留下你的邮箱,用AT替换调你的@,老高有一个闲置的VPS可以提供测试ss帐号,也是搬瓦工的。
密码大概想起来再改一次,流量不多,看油兔就算了吧。
浏览器
shadowsocks的浏览器支持主要是通过扩展设置代理。目前chrome、firefox、Safari、Opera浏览器都完美支持。
浏览器只要配置一下,使用客户端提供的端口就能够工作了。
值得一提的gfwlist,有了他你无需自己写规则了,把它加入在线规则里,更新一下即可!
https://autoproxy-gfwlist.googlecode.com/svn/trunk/g{防}f{he}w{xie}list.txt
firefox -> Foxyproxy chrome -> switchsharp
2014年8月20日更新:
增加一个客户端
2015年1月7日更新:
Proxy SwitchyOmega更新
2015年01月08日更新:
文章重构
2015年3月12日更新:
使用supervisor托管shadowsocks,让shadowsocks运行的更稳定!
猜你喜欢:
windows电脑有客户端版本吗 SS的
必须有 http://www.phpgao.com/download_shadowsocks.html
请问老高,自己建的ss为什么电脑能正常连上,ios端却不能呢
果然是客户端的问题 重装一遍又好了 谢谢老高!还有一个问题:为什么我搭建好的ss经常掉进程 需要执行ssserver -c命令启动才能继续使用呢?而且执行完后经常提示ss的端口被占用 修都改了好多次了
越狱了 之前用iPad可以连上 现在也连不上了
这不很明显么
有没有可能是ios 客户端的问题
现在用你免费分享的账号也连不上了 难道是网络受到干扰了?
我检查了,上海电信是可以使用的
用你分享的号也连不上⋯⋯
配置问题,换一个加密方式试试
你越狱了没?
老高,我的邮箱342539200ATqq.com,蹭一下你的vps~
不是有免费使用的么
请问老高,最近换了搬瓦工的vps,按照老高的教程搭配了ss,Mac下可以通过ss翻墙,windows下却不能翻墙,什么原因呢?
用的是shadowsocks2.5.1
用的什么客户端?
从头来一遍的时候, 第一步就有问题了,apt-get install build-essential autoconf libtool libssl-dev gcc -y 有几处“ 404 Not Found [IP: 91.189.92.201 80]“ 是不是因为这个问题,没法继续安装? ************************************************************** KiwiVM Task File, executed: Sun, 30 Aug 2015 09:11:36 -0400 ************************************************************** # apt-get install build-essential autoconf libtool libssl-dev gcc -y Reading package lists... Building dependency tree... Reading state information... The following extra packages will be installed: automake autotools-dev cpp cpp-4.8 dpkg-dev fakeroot g++ g++-4.8 gcc-4.8 libalgorithm-diff-perl libalgorithm-diff-xs-perl libalgorithm-merge-perl libasan0 libatomic1 libc-dev-bin libc6 libc6-dev libcloog-isl4 libdpkg-perl libfakeroot libfile-fcntllock-perl libgcc-4.8-dev libisl10 libitm1 libltdl-dev libmpc3 libmpfr4 libquadmath0 libssl-doc libssl1.0.0 libstdc++-4.8-dev libtimedate-perl linux-libc-dev manpages-dev patch zlib1g-dev Suggested packages: autoconf2.13 autoconf-archive gnu-standards autoconf-doc cpp-doc gcc-4.8-locales debian-keyring g++-multilib g++-4.8-multilib gcc-4.8-doc libstdc++6-4.8-dbg gcc-multilib automake1.9 flex bison gdb gcc-doc gcc-4.8-multilib libgcc1-dbg libgomp1-dbg libitm1-dbg libatomic1-dbg libasan0-dbg libtsan0-dbg libbacktrace1-dbg libquadmath0-dbg glibc-doc libtool-doc libstdc++-4.8-doc automaken gfortran fortran95-compiler gcj-jdk diffutils-doc The following NEW packages will be installed: autoconf automake autotools-dev build-essential cpp cpp-4.8 dpkg-dev fakeroot g++ g++-4.8 gcc gcc-4.8 libalgorithm-diff-perl libalgorithm-diff-xs-perl libalgorithm-merge-perl libasan0 libatomic1 libc-dev-bin libc6-dev libcloog-isl4 libdpkg-perl libfakeroot libfile-fcntllock-perl libgcc-4.8-dev libisl10 libitm1 libltdl-dev libmpc3 libmpfr4 libquadmath0 libssl-dev libssl-doc libstdc++-4.8-dev libtimedate-perl libtool linux-libc-dev manpages-dev patch zlib1g-dev The following packages will be upgraded: libc6 libssl1.0.0 2 upgraded, 39 newly installed, 0 to remove and 88 not upgraded. Need to get 3597 kB/33.7 MB of archives. After this operation, 98.2 MB of additional disk space will be used. Err http://archive.ubuntu.com/ubuntu/ trusty-updates/main libssl1.0.0 i386 1.0.1f-1ubuntu2.11 404 Not Found [IP: 91.189.92.201 80] Err http://security.ubuntu.com/ubuntu/ trusty-security/main libssl1.0.0 i386 1.0.1f-1ubuntu2.11 404 Not Found [IP: 91.189.91.14 80] Err http://security.ubuntu.com/ubuntu/ trusty-security/main linux-libc-dev i386 3.13.0-52.85 404 Not Found [IP: 91.189.91.14 80] Err http://archive.ubuntu.com/ubuntu/ trusty-updates/main patch i386 2.7.1-4ubuntu2 404 Not Found [IP: 91.189.92.201 80] Err http://archive.ubuntu.com/ubuntu/ trusty-updates/main libssl-dev i386 1.0.1f-1ubuntu2.11 404 Not Found [IP: 91.189.92.201 80] Err http://security.ubuntu.com/ubuntu/ trusty-security/main libssl-dev i386 1.0.1f-1ubuntu2.11 404 Not Found [IP: 91.189.91.14 80] Err http://archive.ubuntu.com/ubuntu/ trusty-updates/main libssl-doc all 1.0.1f-1ubuntu2.11 404 Not Found [IP: 91.189.92.201 80] Err http://security.ubuntu.com/ubuntu/ trusty-security/main libssl-doc all 1.0.1f-1ubuntu2.11 404 Not Found [IP: 91.189.91.14 80] E: Failed to fetch http://security.ubuntu.com/ubuntu/pool/main/o/openssl/libssl1.0.0_1.0.1f-1ubuntu2.11_i386.deb 404 Not Found [IP: 91.189.91.14 80] E: Failed to fetch http://security.ubuntu.com/ubuntu/pool/main/l/linux/linux-libc-dev_3.13.0-52.85_i386.deb 404 Not Found [IP: 91.189.91.14 80] E: Failed to fetch http://archive.ubuntu.com/ubuntu/pool/main/p/patch/patch_2.7.1-4ubuntu2_i386.deb 404 Not Found [IP: 91.189.92.201 80] E: Failed to fetch http://security.ubuntu.com/ubuntu/pool/main/o/openssl/libssl-dev_1.0.1f-1ubuntu2.11_i386.deb 404 Not Found [IP: 91.189.91.14 80] E: Failed to fetch http://security.ubuntu.com/ubuntu/pool/main/o/openssl/libssl-doc_1.0.1f-1ubuntu2.11_all.deb 404 Not Found [IP: 91.189.91.14 80] E: Unable to fetch some archives, maybe run apt-get update or try with --fix-missing? Exit code: 100 *** End of transmission *** 用的root shell 给您添麻烦了。
恩,应该比较好找
404的话是文件找不到,可能被删除了。
好多同学都肉翻了,真嫉妒
暂时住徐汇区,在金科路上班。有推荐租房吗?
好远,我对浦东不熟啊……多说又崩了??
好吧,我看看centos咋弄pptp服务器,你现在在哪里住,哪里上班啊?
伙计,好好干,争取肉翻啊
有啥好嫉妒的,取取经啊,你们吃技术饭的好办吧
难道熊猫连ubuntu的数据源里头的也给干掉了??
还是用centos吧,源有问题
请问如何退款?速度太慢了,150块这速度太坑了,50k不到!
上海电信连google都打不开,更坑。直接在后台开一个ticket,说你要退款
多说这个用google无法登陆?我的是ubuntu的系统,安装到这一步【shadowsocks 下载及编译】发现往下进行虽然绿色提醒『Completed.』但是到对应路径找不到任何文件夹啥也没有。【/usr/local/bin/】个路径下头是空的,咋办
运行 which ss-server
************************************************************** KiwiVM Task File, executed: Sun, 30 Aug 2015 08:57:51 -0400 ************************************************************** # which ss-server Exit code: 1 *** End of transmission *** 我是在网页操作的,有影响么
高老师,我按你的教程搭建了shadowsocks,在win7系统下可以使用,但是在mac和android上面使用不了,是需要额外设置什么么?
老高,我设置了pptp的VPN,客户端能够连接上,但是不能访问网络,这个怎么搞
老高你好,我有个香港的VPS搭建ss已成功翻墙。ping值很低,但本地电脑访问速度特别的慢才100-200K/S,测试了VPS的网速是相当的快,30M/S。家里是联通30M,我觉得网速不应该如此慢,却找不到原因,希望能指点一下。感谢!
电信吗?
高老师能不能介绍一下怎么做负载均衡?
你好,请问可以帮忙编译一个MT7620芯片的SHADOWSOCKS 2.14版本的吗?貌似挂2.14版本以上的NAT类型会严格.
手头目前没有资源,等以后吧
在sourceforge找到了shadowsocks的编译版本存储库了.http://sourceforge.net/projects/openwrt-dist/files/shadowsocks-libev/
从哪里过来的应该也知道。 挺详细的,可以zt下。thanks。这么多方法应该就是这个没试过了。
有空一定ZT下
请问, 搬瓦工的一键安装shadowsocks ,然后配置文件在哪里,密码在哪里改,上次我记得我打开过了,密码明文的,现在死活找不到在哪里了
请教老高,执行这个 /usr/local/bin/ss-server 提示 ERROR: Invalid config path. 什么问题呢 ?求解
需要指定config文件位置
谢谢,就是因为这个
你的config文件不存在或者格式错误
服务器或者客户端配置文件有问题
[root@localhost shadowsocks-libev]# /usr/local/bin/ss-local -c /home/config.json 2015-10-23 10:46:10 ERROR: Failed to read the config file. ----------------------------- 请问哪里错了,不好意思,我是小白
运行ss-server后的错误信息如下 2015-10-23 11:42:51 ERROR: invalid header with addr type 119 2015-10-23 11:42:51 ERROR: failed to handshake with 45.78.0.28 这是怎么回事?端口是33333
config.json我建在了/home
-c
我也出现这个提示了,请问怎么指定?
老高 请教个问题 我在KiwiVM 界面里一键安装了shadowsocks,现在想创建多个ss账户该如何操作呢?谢谢啦
不行,需要自己添加配置文件
下午在办公室用笔记本(windows7)用的很正常,但是回到家后用windows8却不能连接,换MacBook也是一样,日志提示我“由于连接方在一段时间后没有正确答复或连接的主机没有反应,连接尝试失败”,请问老高,这是怎么回事呢?
那就对了,关键字 长城宽带 搬瓦工
你家什么网?
建议检查配置信息
什么配置?我又重新安装了一遍系统+SS,在本机客户端依然还是显示“由于连接方在一段时间后没有正确答复或连接的主机没有反应,连接尝试失败”
长城宽带
老高,昨天我下班把4300断电后放回抽屉,今天早上拿出来再连的时候,发现谷歌浏览器可以访问facebook了,手机的问题也解决了。好神奇,难道有的问题必须断电重启才能解决吗?
好吧,我觉得还是直连比较好,用路由太折腾了
老高,你的意思是手机平台让他们通过客户端上而不经过路由?
目前的问题是路由还是不够智能,所以还是用客户端控制访问比较好,访问有两种方式
1. 用路由器提供的1080代理端口
2. 直连服务器